An uninterruptible power supply (UPS) is a component that continues operating for at least a brief period of time when the power supply is interrupted.
In today’s technology-driven world, an uninterrupted power supply is crucial to keep our electronic devices and systems functioning without interruption. Power outages can lead to data loss, hardware damage, and productivity setbacks. That’s where Uninterruptible Power Supplies (UPS) come into play. A UPS provides a temporary power source during outages and helps prevent such issues.
An Uninterruptible Power Supply (UPS) is crucial for safeguarding electronic devices and systems against power outages. It provides instant backup power, preventing data loss, equipment damage, and disruptions. UPS ensures business continuity and protects sensitive equipment, making it indispensable for reliable operations in various sectors.
In this guide, we will walk you through connecting a UPS to your power supply to ensure the safety and continuity of your devices.
Understanding the Basics of UPS
Uninterruptible Power Supply (UPS) systems offer essential backup power during outages, safeguarding devices, data, and operations across diverse industries.
Before we dive into the steps, let’s briefly understand the different types of UPS systems:
Offline/Standby UPS
This type switches to battery power only when it detects a power outage. It’s ideal for basic protection against sudden power cuts but may not be suitable for sensitive equipment due to the short switching time.
Line-Interactive UPS
These offer a higher level of protection by automatically regulating minor fluctuations in voltage. They are suitable for small businesses and home offices.
Online/Double Conversion UPS
This type provides the highest level of protection as it constantly powers devices through its battery, rectifying incoming AC power. It’s commonly used for data centers and critical systems.
Steps to Connect a UPS to Your Power Supply
Connecting a UPS to your power supply involves several straightforward steps. First, identify the devices requiring backup power and calculate their combined wattage to select an appropriately sized UPS. Next, plug the UPS into a wall outlet and charge it according to the manufacturer’s instructions. Connect your critical devices to the UPS’s outlets. For added protection, you can connect network and phone lines if your UPS model supports it. Finally, power on the UPS and ensure proper functionality through a self-test. This process guarantees continuous power during outages, safeguarding your equipment and data from unexpected disruptions.
Now try to serve you proper guidelines on How to Connect a UPS to Your Power Supply for your help.
Choose the Right UPS
Select a UPS that meets the power requirements of your connected devices. Consider the total power consumption of all devices you want to protect, along with their surge requirements. Choose a UPS with enough outlets and capacity to accommodate your devices.
Select a Suitable Location
Place the UPS in a well-ventilated, dry area. Make sure it’s easily accessible in case you need to perform maintenance or check its status. Keep it away from direct sunlight and sources of heat.
Connect the Battery
Most UPS systems come with their batteries pre-installed. However, if you need to install the battery, follow the manufacturer’s instructions carefully. Typically, this involves connecting the battery to the designated terminals.
Connect Your Devices
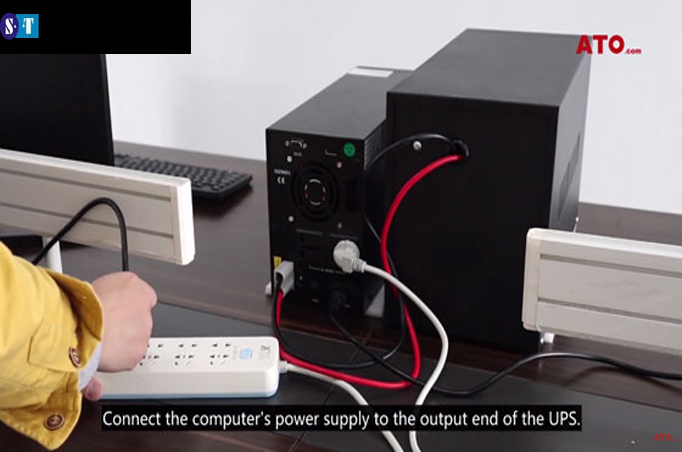
Identify the devices you want to protect with the UPS. Connect them to the UPS outlets using the appropriate power cables. It’s a good practice to label each cable for easy identification later.
Connect to Power Supply
Plug the UPS into a standard wall outlet. Avoid using extension cords or power strips, as they can increase the risk of electrical issues. The UPS will start charging its battery as soon as it’s connected to power.
Install Monitoring Software (If Applicable)
Some UPS models come with monitoring software that allows you to track the UPS’s status, battery life, and power consumption on your computer. If your UPS supports this feature, follow the manufacturer’s instructions to install and configure the software.
Test the Setup
Once everything is connected, perform a test to ensure that the UPS is working correctly. Simulate a power outage by unplugging the UPS from the wall outlet. Your connected devices should seamlessly switch to the UPS’s battery power without interruption. If not, consult the user manual or manufacturer’s support.
Regular Maintenance
Perform regular maintenance to ensure your UPS remains in optimal condition. This includes checking the battery health, cleaning the unit from dust, and verifying that all connections are secure.
Replace Batteries When Needed
UPS batteries have a limited lifespan. Depending on usage and environmental factors, they might need replacement every 2 to 5 years. Follow the manufacturer’s guidelines for battery replacement and disposal.
Conclusion
Connecting a UPS to your power supply is a simple yet crucial process to safeguard your electronic devices from power disruptions. By choosing the right UPS, following proper installation steps, and conducting regular maintenance, you can ensure uninterrupted power supply and protect your valuable equipment. Remember, a well-maintained UPS not only provides peace of mind but also extends the lifespan of your electronic devices.